
领先一步
VMware 提供培训和认证,助您加速进步。
了解更多
模型上下文协议(Model Context Protocol),简称MCP,已经席卷了整个AI世界。如果您一直关注我们的博客,您可能已经阅读了该主题的介绍文章,即将您的AI连接到一切:Spring AI的MCP Boot Starters。MCP的安全性方面发展迅速,最新版本的规范得到了生态系统越来越多的支持。为了满足Spring用户的需求,我们已经在Github上孵化了一个专门的项目:spring-ai-community/mcp-security。本周,我们发布了首个版本,您现在可以将其添加到基于Spring AI 1.1.x的应用程序中。在这篇文章中,我们将探讨
根据MCP规范的授权部分,通过HTTP暴露的MCP服务器必须使用OAuth 2访问令牌进行保护。对MCP服务器的任何调用都必须包含一个头部Authorization: Bearer <access_token>,其中访问令牌是从授权服务器(例如:Okta、Github等)代表用户获取的。MCP服务器还必须明确声明它信任的授权服务器,以便MCP客户端可以动态发现它们,向授权服务器注册自己并获取令牌。我们稍后会讨论授权服务器,但目前我们假设您已经配置并运行了一个授权服务器,地址为<AUTH_SERVER_URL>,我们将把我们的MCP服务器连接到它。如果您需要设置授权服务器,请参见下一节。
首先,将所需的依赖项添加到您的项目中
Maven
<dependencies>

    <!-- Spring AI MCP starter -->
    <dependency>
        <groupId>org.springframework.ai</groupId>
        <artifactId>spring-ai-starter-mcp-server-webmvc</artifactId>
    </dependency>
    <!-- MCP Security -->
    <dependency>
        <groupId>org.springaicommunity</groupId>
        <artifactId>mcp-server-security</artifactId>
        <version>0.0.3</version>
    </dependency>
    <!-- MCP Security dependencies -->
    <dependency>
        <groupId>org.springframework.boot</groupId>
        <artifactId>spring-boot-starter-oauth2-resource-server</artifactId>
    </dependency>

</dependencies>
Gradle
implementation("org.springframework.ai:spring-ai-starter-mcp-server-webmvc")
implementation("org.springaicommunity:mcp-server-security:0.0.3")
implementation("org.springframework.boot:spring-boot-starter-oauth2-resource-server")
确保在您的application.properties中启用了MCP服务器,并注入您的授权服务器URL
spring.ai.mcp.server.name=my-cool-mcp-server
# Supported protocols: STREAMABLE, STATELESS
spring.ai.mcp.server.protocol=STREAMABLE
# Choose any property name you'd like
# You MAY use the usual Spring well-known "spring.security.oauth2.resourceserver.jwt.issuer-uri".
authorization.server.url=<AUTH_SERVER_URL>
我们将添加一个简单的MCP工具,它根据输入语言(“英语”、“法语”等)和用户姓名向用户打招呼。
@Service
public class MyToolsService {

    @McpTool(name = "greeter", description = "A tool that greets you, in the selected language")
    public String greet(
            @ToolParam(description = "The language for the greeting (example: english, french, ...)") String language
    ) {
        if (!StringUtils.hasText(language)) {
            language = "";
        }
        var authentication = SecurityContextHolder.getContext().getAuthentication();
        var name = authentication.getName();
        return switch (language.toLowerCase()) {
            case "english" -> "Hello, %s!".formatted(name);
            case "french" -> "Salut %s!".formatted(name);
            default -> ("I don't understand language \"%s\". " +
                        "So I'm just going to say Hello %s!").formatted(language, name);
        };
    }

}
在此示例中,该工具将从SecurityContext中查找用户的姓名,并创建个性化问候语。用户的姓名将是用于验证请求的JWT访问令牌中的sub声明。
最后但同样重要的是,我们添加一个用于安全配置的类,例如McpServerSecurityConfiguration
@Configuration
@EnableWebSecurity
class McpServerSecurityConfiguration {

    @Value("${authorization.server.url}")
    private String authServerUrl;

    @Bean
    SecurityFilterChain securityFilterChain(HttpSecurity http) throws Exception {
        return http
                // Enforce authentication with token on EVERY request
                .authorizeHttpRequests(auth -> auth.anyRequest().authenticated())
                // Configure OAuth2 on the MCP server
                .with(
                        McpServerOAuth2Configurer.mcpServerOAuth2(),
                        (mcpAuthorization) -> {
                            // REQUIRED: the authserver's issuer URI
                            mcpAuthorization.authorizationServer(this.authServerUrl);
                            // OPTIONAL: enforce the `aud` claim in the JWT token.
                            mcpAuthorization.validateAudienceClaim(true);
                        }
                )
                .build();
    }

}
使用./mvnw spring-boot:run或./gradlew bootRun运行应用程序。它应该在8080端口启动。如果您尝试访问https://:8080/mcp上的MCP服务器,您将收到一个WWW-authenticate,指示OAuth2资源元数据URL
curl -XPOST  -w '%{http_code}\n%header{www-authenticate}' https://:8080/mcp
#
# Will print out:
#
# 401
# Bearer resource_metadata=https://:8080/.well-known/oauth-protected-resource/mcp
元数据URL本身将向潜在客户端指示授权服务器的位置
curl https://:8080/.well-known/oauth-protected-resource/mcp
#
# Will print out:
#
# {
#   "resource": "https://:8080/mcp",
#   "authorization_servers": [
#     "<AUTH_SERVER_URL>"
#   ],
#   "resource_name": "Spring MCP Resource Server",
#   "bearer_methods_supported": [
#     "header"
#   ]
# }
这对人类来说用处不大,但它有助于其他程序找到您的MCP服务器的身份验证入口点。每个基于AI的应用程序都有自己独特的方式添加MCP服务器,但调试服务器的一个好工具是MCP检查器。您可以轻松地运行它
npx @modelcontextprotocol/[email protected]
在用户界面中,您必须设置服务器的URL,然后点击“打开身份验证设置”

在身份验证设置中,选择“快速OAuth流程”。
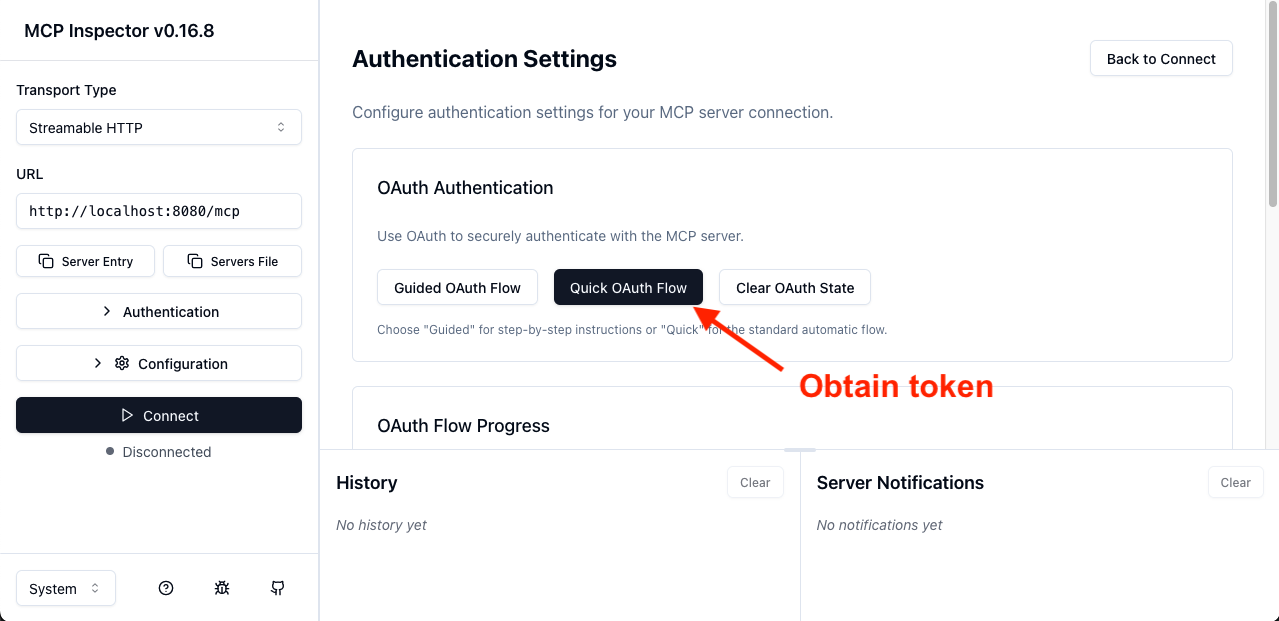
这将重定向您到授权服务器。登录后,您将被重定向回MCP检查器,它将显示一个成功消息和访问令牌的前几个字符。从那里,您应该能够连接并最终调用我们的“问候器”工具
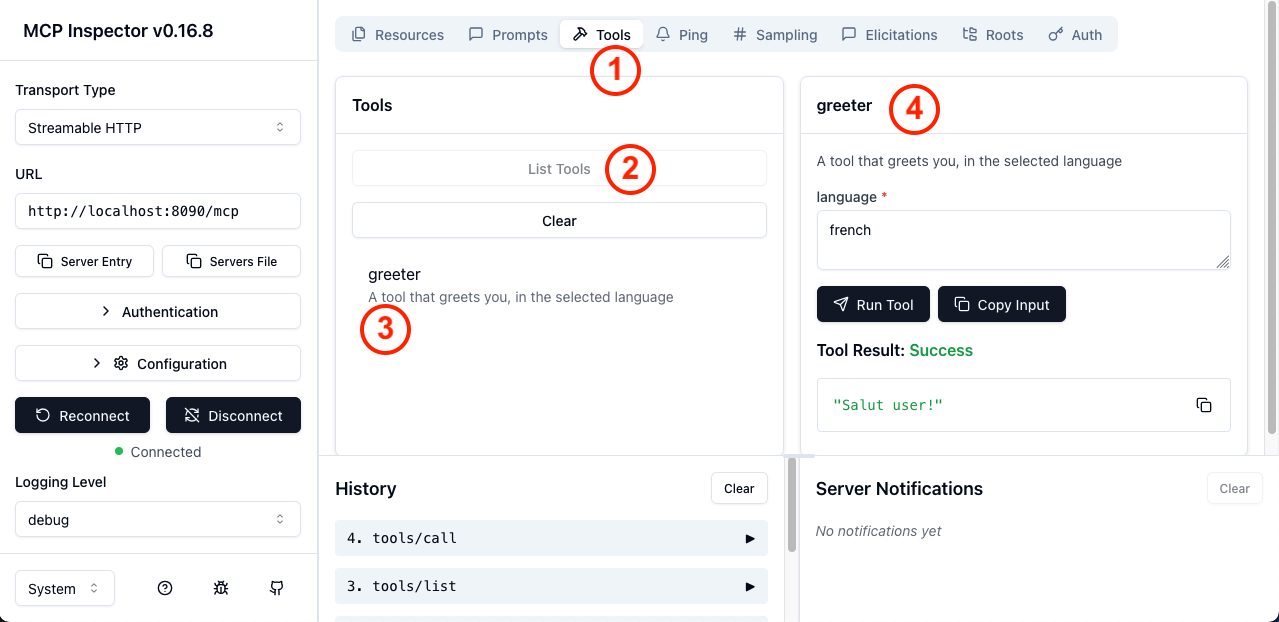
在上面的截图中,按顺序您可以执行以下操作
工具选项卡列出工具greeter工具这样,您就拥有了第一个符合规范并受OAuth2保护的MCP服务器。此实现存在变体,例如MCP服务器上的所有内容都可公开访问(例如“列出工具”),但工具调用本身除外。这不符合规范,但满足某些特定需求。您可以在mcp-security文档的专用部分中了解更多信息。
当然,为了让用户登录,您必须将您的MCP服务器连接到一个符合MCP所需规范的授权服务器,例如动态客户端注册。虽然有许多SaaS选项可用,您也可以使用Spring Authorization Server自行编写。
要使用Spring创建一个MCP兼容的授权服务器,请创建一个新的Spring项目,包含Spring Authorization Server,并添加MCP特有的
Maven
<dependency>
    <groupId>org.springaicommunity</groupId>
    <artifactId>mcp-authorization-server</artifactId>
    <version>0.0.3</version>
</dependency>
Gradle
implementation("org.springaicommunity:mcp-authorization-server:0.0.3")
您可以按照通常的方式配置授权服务器(参见参考文档)。以下是一个示例application.yml,用于注册一个默认客户端和一个默认用户
spring:
  application:
    name: sample-authorization-server
  security:
    oauth2:
      authorizationserver:
        client:
          default-client:
            token:
              access-token-time-to-live: 1h
            registration:
              client-id: "default-client-id"
              client-secret: "{noop}default-client-secret"
              client-authentication-methods:
                - "client_secret_basic"
                - "none"
              authorization-grant-types:
                - "authorization_code"
                - "client_credentials"
              redirect-uris:
                - "http://127.0.0.1:8080/authorize/oauth2/code/authserver"
                - "https://:8080/authorize/oauth2/code/authserver"
                # mcp-inspector
                - "https://:6274/oauth/callback"
    user:
      # A single user, named "user"
      name: user
      password: password

server:
  port: 9000
  servlet:
    session:
      cookie:
        # Override the default cookie name (JSESSIONID).
        # This allows running multiple Spring apps on localhost, and they'll each have their own cookie.
        # Otherwise, since the cookies do not take the port into account, they are confused.
        name: MCP_AUTHORIZATION_SERVER_SESSIONID
这只是一个例子,您可能需要编写自己的配置。通过此配置,将注册一个用户(用户名:user,密码:password)。还将有一个OAuth2客户端(default-client-id / default-client-secret)。然后,您可以使用通常的Spring Security API,即安全过滤器链,激活所有授权服务器功能。
@Bean
SecurityFilterChain securityFilterChain(HttpSecurity http) throws Exception {
    return http
            // all requests must be authenticated
            .authorizeHttpRequests(auth -> auth.anyRequest().authenticated())
            // enable authorization server customizations
            .with(McpAuthorizationServerConfigurer.mcpAuthorizationServer(), withDefaults())
            // enable form-based login, for user "user"/"password"
            .formLogin(withDefaults())
            .build();
}
这样,您的Spring授权服务器将支持OAuth 2动态客户端注册以及OAuth 2资源指示符。将您的MCP服务器连接到此授权服务器与大多数AI工具(如Claude Desktop、Cursor或MCP检查器)兼容。
虽然MCP规范强制要求使用OAuth2进行安全认证,但许多环境不具备支持此用例的基础设施。为了在缺乏OAuth 2的环境中使用,许多客户端,包括MCP检查器本身,允许您在发出请求时传递自定义请求头。这为替代认证流程打开了大门,包括基于API密钥的安全认证。MCP安全项目支持API密钥,我们将在下面进行展示。
首先,将依赖项添加到您的项目中
<dependencies>

    <!-- Spring AI MCP starter -->
    <dependency>
        <groupId>org.springframework.ai</groupId>
        <artifactId>spring-ai-starter-mcp-server-webmvc</artifactId>
    </dependency>
    <!-- MCP Security -->
    <dependency>
        <groupId>org.springaicommunity</groupId>
        <artifactId>mcp-server-security</artifactId>
        <version>0.0.3</version>
    </dependency>
    <!-- MCP Security dependencies -->
    <dependency>
        <groupId>org.springframework.boot</groupId>
        <artifactId>spring-boot-starter-security</artifactId>
    </dependency>

</dependencies>
Gradle
implementation("org.springframework.ai:spring-ai-starter-mcp-server-webmvc")
implementation("org.springaicommunity:mcp-server-security:0.0.3")
implementation("org.springframework.boot:spring-boot-starter-security")
确保在您的application.properties中启用了MCP服务器
spring.ai.mcp.server.name=my-cool-mcp-server
# Supported protocols: STREAMABLE, STATELESS
spring.ai.mcp.server.protocol=STREAMABLE
通过API密钥进行身份验证的“实体”,例如用户或服务账户,由ApiKeyEntity表示。MCP服务器会检查特定的请求头以获取API密钥,加载实体,并验证密钥。您可以提供自己的实体实现和实体仓库,以进行特定的安全验证。
有了这些,您就可以按照通常的Spring Security方式配置项目的安全性了
@Configuration
@EnableWebSecurity
class McpServerConfiguration {

    @Bean
    SecurityFilterChain securityFilterChain(HttpSecurity http) throws Exception {
        return http.authorizeHttpRequests(authz -> authz.anyRequest().authenticated())
                .with(
                        McpApiKeyConfigurer.mcpServerApiKey(),
                        (apiKey) -> apiKey.apiKeyRepository(apiKeyRepository())
                )
                .build();
    }

    private ApiKeyEntityRepository<ApiKeyEntityImpl> apiKeyRepository() {
        var apiKey = ApiKeyEntityImpl.builder()
                .name("test api key")
                .id("api01")
                .secret("mycustomapikey")
                .build();

        return new InMemoryApiKeyEntityRepository<>(List.of(apiKey));
    }

}
这里我们使用一个存储简单密钥的API Key存储库。然后您应该能够使用请求头X-API-key: api01.mycustomapikey调用您的MCP服务器。X-API-key是传递API密钥的默认请求头名称,后跟请求头值{id}.{secret}。密钥以bcrypt哈希形式存储在服务器端。mcpServerApiKey()配置器提供了更改请求头名称的选项,甚至提供了专门的API来从传入的HTTP请求中提取API密钥。
如果您想了解更多信息,请访问spring-ai-community/mcp-security项目,获取文档和示例。您还将找到对使用Spring AI和Spring Security进行客户端MCP安全性的支持。在您自己的项目和应用程序中尝试一下,与生态系统的其余部分进行测试,并帮助我们改进它!我们欢迎贡献,包括反馈和问题。
在另一篇博文中,我们将介绍如何使用org.springaiframework:mcp-client-security模块在客户端实现OAuth 2。