保持领先
VMware 提供培训和认证,助您快速提升。
了解更多在Spring Android 和 Maven(第一部分)中,我描述了如何使用 Maven 从命令行构建 Android 应用程序。在这篇博文中,我将向您展示如何从 Eclipse IDE 构建具有 Maven 依赖管理的 Android 应用程序。该应用程序还将展示本周发布的 Spring Android 1.0.0.M2 的最新特性。
Maven Android Plugin 允许您使用 Maven 构建 Android 应用程序并受益于依赖管理。Google 的 Android Development Tools (ADT) 插件允许您在 Eclipse IDE 中开发和构建 Android 应用程序。要在 Eclipse 中实现 Maven 依赖管理,需要安装 Maven Integration for Android Development Tools 插件,该插件集成了 m2eclipse、ADT Plugin 和 Maven Android Plugin。这篇博文将向您展示如何安装此插件并使用它在 Eclipse IDE 中启用基于 Maven 的依赖管理。
本博文中使用的各组件的具体版本如下所示:
在构建或编译任何代码之前,我们需要安装和配置所需的 Eclipse 插件。在 第一部分中,我讨论了安装 Android SDK,所以我假设您已经完成了这一步。但是,如果您还没有安装,则需要先安装它才能继续。此外,您还需要已经安装 Eclipse 3.5 或更高版本。在此示例中,我使用的是基于 Eclipse 3.6.1 的 SpringSource Tool Suite 2.5.2。
需要安装三个 Eclipse 插件:适用于 Eclipse 的 ADT Plugin、适用于 Eclipse 的 Maven Integration 和适用于 Android Development Tools 的 Maven Integration。您有两种安装这些插件的选项,要么使用 Eclipse Marketplace Client,要么手动安装每个插件。
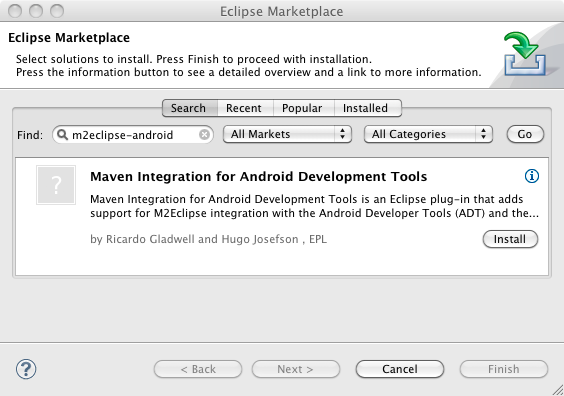
根据您的 Eclipse 版本,您可能已经安装了 Eclipse Marketplace Client。Marketplace Client 将简化插件安装,因为它会传递包含所有必需的插件。


使用 Marketplace Client 的替代方法是手动安装每个插件。如果您已经从 Marketplace 安装了插件,则可以跳过到 Sample Android Application 部分。对于每个插件,从 Eclipse 的 Help 菜单中,选择 Install New Software... 并单击 Add... 按钮。
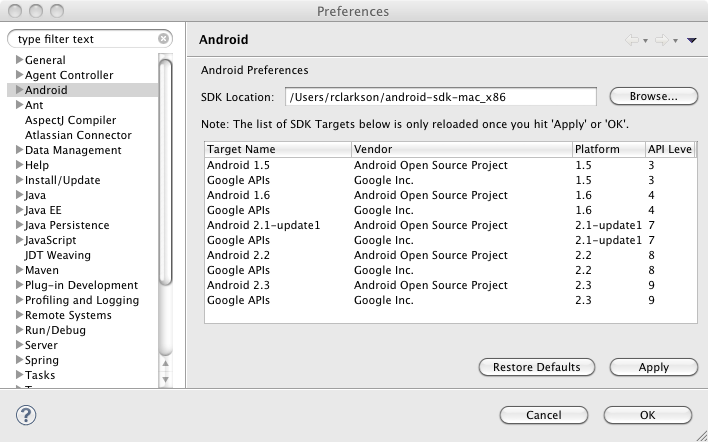
第一步是安装适用于 Eclipse 的 ADT (Android Developer Tools) Plugin。这是 Google 提供的用于开发 Android 应用程序的官方插件。如果您已经安装了 ADT Plugin,请从 Eclipse 的 Help 菜单中运行 Check for Updates 来验证您拥有最新版本。


注意:如果您在安装 ADT 时遇到任何问题,可以访问 Android 网站获取更多信息。
下一步是安装 m2eclipse 插件。STS 2.5.2 附带此插件。但是,如果您使用的是旧版本,或者您已经安装了该插件,您需要验证您拥有最新版本。适用于 Android Development Tools 的 Maven Integration 需要版本 0.12.0 或更高版本。

我们还需要安装一个插件,这个插件将所有这些功能整合在一起。在您设置好 Android SDK 并在 Eclipse 中配置好 ADT Plugin 后,安装 Maven Integration for Android Development Tools 插件。

现在我们已经安装并配置好所有必要的插件,准备好使用示例 Android 应用程序来测试我们的设置了。我们将使用为第一部分博客文章创建的相同示例应用程序,但是该示例应用程序已更新,以便在最新的 Android 平台 SDK,2.3.1 API Level 9 上运行。如果您没有安装此 SDK 平台,您需要在构建示例代码之前安装它。
运行以下命令克隆 Spring Mobile 示例仓库。
$ git clone git://git.springsource.org/spring-mobile/samples.git spring-mobile-samples
如果 git:// URL 不可访问,您可能需要尝试 samples repository 的备用 URL。
$ git clone http://http.git.springsource.org/spring-mobile/samples.git spring-mobile-samples
在 Eclipse 中打开源代码之前,导航到 spring-android-showcase/client 项目目录,并验证项目是否可以使用 Android Maven Plugin 构建成功。
$ mvn clean install
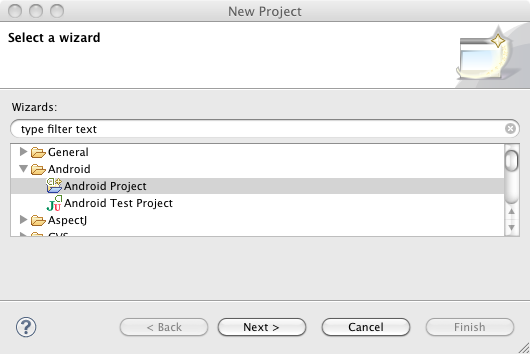
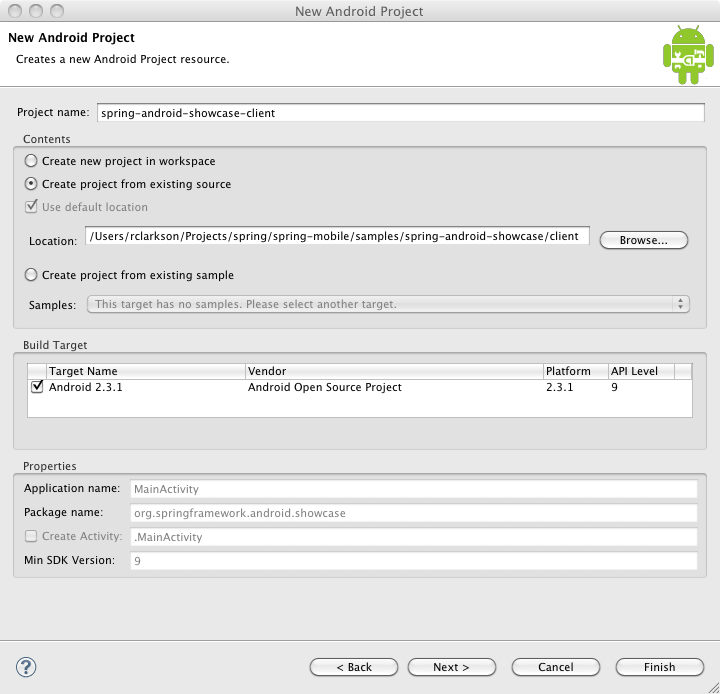
假设项目已从命令行成功构建,我们就可以在 Eclipse 中打开项目了。


示例项目现已加载到 Eclipse 中。您会注意到的第一件事是 Package Explorer 中项目上方有一个很大的红色“X”,这表示它当前无法构建。由于我们尚未为该项目配置 Maven,因此这是预期的行为。
要启用 Maven 依赖管理,请在 Package Explorer 中右键单击 spring-android-showcase-client,然后从上下文菜单中选择 Maven -> Enable Dependency Management。
示例项目已经包含以下 Maven POM 文件。如果您的项目中没有现有的 POM,Eclipse 会提示您创建一个。请注意在 build 部分中使用了 maven-android-plugin 和 maven-compiler plugin。
<project xmlns="http://maven.apache.org/POM/4.0.0" xmlns:xsi="http://www.w3.org/2001/XMLSchema-instance"
  xsi:schemaLocation="http://maven.apache.org/POM/4.0.0 http://maven.apache.org/xsd/maven-4.0.0.xsd">
	<modelVersion>4.0.0</modelVersion>

	<groupId>org.springframework.android</groupId>
	<artifactId>spring-android-showcase-client</artifactId>
	<version>1.0.0.BUILD-SNAPSHOT</version>
	<packaging>apk</packaging>
	<name>spring-android-showcase-client</name>
	<url>http://www.springsource.org</url>
	<organization>
		<name>SpringSource</name>
		<url>http://www.springsource.org</url>
	</organization>

	<properties>
		<android-platform>9</android-platform>
		<android-emulator>9</android-emulator>
		<maven-android-plugin-version>2.8.4</maven-android-plugin-version>
		<maven-compiler-plugin-version>2.3.2</maven-compiler-plugin-version>
		<android-version>2.3.1</android-version>
		<spring-android-version>1.0.0.M2</spring-android-version>
		<jackson-version>1.7.2</jackson-version>
		<simple-version>2.4.1</simple-version>
		<android-rome-version>1.0.0-r2</android-rome-version>
	</properties>

	<build>
		<sourceDirectory>src</sourceDirectory>
		<finalName>${project.artifactId}</finalName>
		<plugins>
			<plugin>
				<groupId>com.jayway.maven.plugins.android.generation2</groupId>
				<artifactId>maven-android-plugin</artifactId>
				<version>${maven-android-plugin-version}</version>
				<configuration>
					<sdk>
						<platform>${android-platform}</platform>
					</sdk>
					<emulator>
						<avd>${android-emulator}</avd>
					</emulator>
					<deleteConflictingFiles>true</deleteConflictingFiles>
					<undeployBeforeDeploy>true</undeployBeforeDeploy>
				</configuration>
				<extensions>true</extensions>
			</plugin>
			<plugin>
				<artifactId>maven-compiler-plugin</artifactId>
				<version>${maven-compiler-plugin-version}</version>
			</plugin>
		</plugins>
	</build>

	<dependencies>
		<dependency>
			<groupId>com.google.android</groupId>
			<artifactId>android</artifactId>
			<version>${android-version}</version>
			<scope>provided</scope>
		</dependency>
		<dependency>
			<groupId>org.springframework.android</groupId>
			<artifactId>spring-android-rest-template</artifactId>
			<version>${spring-android-version}</version>
		</dependency>
		<dependency>
			<!-- Using Jackson for JSON marshaling -->
			<groupId>org.codehaus.jackson</groupId>
			<artifactId>jackson-mapper-asl</artifactId>
			<version>${jackson-version}</version>
		</dependency>
		<dependency>
			<!-- Using Simple for XML marshaling -->
			<groupId>org.simpleframework</groupId>
			<artifactId>simple-xml</artifactId>
			<version>${simple-version}</version>
			<exclusions>
				<exclusion>
					<artifactId>stax</artifactId>
					<groupId>stax</groupId>
				</exclusion>
				<exclusion>
					<artifactId>stax-api</artifactId>
					<groupId>stax</groupId>
				</exclusion>
			</exclusions>
		</dependency>
		<dependency>
			<!-- Using ROME for RSS and ATOM feeds -->
			<groupId>com.google.code.android-rome-feed-reader</groupId>
			<artifactId>android-rome-feed-reader</artifactId>
			<version>${android-rome-version}</version>
		</dependency>
	</dependencies>

	<repositories>
		<!-- For developing with Android ROME Feed Reader -->
		<repository>
			<id>android-rome-feed-reader-repository</id>
			<name>Android ROME Feed Reader Repository</name>
			<url>https://android-rome-feed-reader.googlecode.com/svn/maven2/releases</url>
		</repository>
		<!-- For testing against latest Spring snapshots -->
		<repository>
			<id>org.springframework.maven.snapshot</id>
			<name>Spring Maven Snapshot Repository</name>
			<url>http://maven.springframework.org/snapshot</url>
			<releases><enabled>false</enabled></releases>
			<snapshots><enabled>true</enabled></snapshots>
		</repository>
		<!-- For developing against latest Spring milestones -->
		<repository>
			<id>org.springframework.maven.milestone</id>
			<name>Spring Maven Milestone Repository</name>
			<url>http://maven.springframework.org/milestone</url>
			<snapshots><enabled>false</enabled></snapshots>
		</repository>
	</repositories>

</project>
Maven 现在将更新所需的依赖项,并且 Eclipse 应该会成功构建项目。一旦 Eclipse 构建项目完成,您应该会在 Package Explorer 窗口中看到 Maven Dependencies classpath container。
有几点需要注意。首先,您可能会看到项目目录中有一个 bin 文件夹。从 Java Build Path 属性(如下所示)中可以看出,默认输出文件夹是 Target 文件夹。所以可以安全地删除 bin 文件夹。
其次,您可能还会注意到项目添加了一个 JRE System Library classpath container。由于我们正在构建一个利用 Android JVM 的 Android 应用程序,您不应该需要引用 JRE。如果您在 Eclipse 中使用 ADT 创建了一个新的 Android 应用程序,您就知道它不会为 JRE 添加 classpath container。我已与 Maven Integration for Android Development Tools 的开发者 Ricardo Gladwell 讨论了这个问题,他创建了一个 工单来研究这个问题。我已从示例项目中删除了 JRE,没有发现任何明显的不良影响。但您可能需要关注该问题以获取更多信息。
要运行示例应用程序,只需在 Package Explorer 中选择 spring-android-showcase-client,然后单击 Run 按钮。示例客户端中的 Maven POM 文件配置为查找名为“9”的 Android Virtual Device (AVD)。如前所述,samples 项目已更新为在 Android Platform SDK 2.3.1 上运行。您需要为此平台配置一个 AVD 才能运行 samples。
第一次运行应用程序时,您应该在 Eclipse 控制台中看到如下内容:
[2011-02-08 14:00:49 - spring-android-showcase-client] ------------------------------
[2011-02-08 14:00:49 - spring-android-showcase-client] Android Launch!
[2011-02-08 14:00:49 - spring-android-showcase-client] adb is running normally.
[2011-02-08 14:00:49 - spring-android-showcase-client] Performing org.springframework.android.showcase.MainActivity activity launch
[2011-02-08 14:00:49 - spring-android-showcase-client] Automatic Target Mode: launching new emulator with compatible AVD '9'
[2011-02-08 14:00:49 - spring-android-showcase-client] Launching a new emulator with Virtual Device '9'
[2011-02-08 14:00:50 - Emulator] 2011-02-08 14:00:50.936 emulator[5951:903] Warning once: This application, or a library it uses, is using NSQuickDrawView, which has been deprecated. Apps should cease use of QuickDraw and move to Quartz.
[2011-02-08 14:00:50 - spring-android-showcase-client] New emulator found: emulator-5554
[2011-02-08 14:00:50 - spring-android-showcase-client] Waiting for HOME ('android.process.acore') to be launched...
[2011-02-08 14:01:21 - spring-android-showcase-client] HOME is up on device 'emulator-5554'
[2011-02-08 14:01:21 - spring-android-showcase-client] Uploading spring-android-showcase-client.apk onto device 'emulator-5554'
[2011-02-08 14:01:23 - spring-android-showcase-client] Installing spring-android-showcase-client.apk...
[2011-02-08 14:01:50 - spring-android-showcase-client] Success!
[2011-02-08 14:01:50 - spring-android-showcase-client] Starting activity org.springframework.android.showcase.MainActivity on device emulator-5554
[2011-02-08 14:01:52 - spring-android-showcase-client] ActivityManager: Starting: Intent { act=android.intent.action.MAIN cat=[android.intent.category.LAUNCHER] cmp=org.springframework.android.showcase/.MainActivity }
AVD 将启动并显示锁定屏幕。将绿色锁从左向右滑动以“打开”Android 设备。打开后,应用程序应该会显示:
在这篇博文中,我们回顾了如何在 Eclipse 中构建一个利用 Maven 依赖管理的示例 Android 应用程序。为了实现这一点,我们使用了 Eclipse、适用于 Eclipse 的 Android Development Tools (ADT) Plugin、Maven Android Plugin、适用于 Android Development Tools 的 Maven Integration 插件以及适用于 Eclipse 的 Maven Integration (m2eclipse) 插件。涉及的组件很多,但是一旦全部配置完毕,就可以轻松构建并部署到 Android 模拟器。如果您在 Android 应用程序中使用第三方库,您应该考虑使用这些工具来帮助管理这些依赖项。