
领先一步
VMware 提供培训和认证,助您快速进步。
了解更多开发、部署和运维云应用程序应该与本地应用程序一样简单(如果不是更简单的话)。这是任何云平台、库或工具背后的指导原则,也应该如此。Spring Cloud——一个开源库——使得为云开发 JVM 应用程序变得容易。有了它,应用程序可以轻松地连接到服务,并在 Cloud Foundry 和 Heroku 等多个云环境中发现有关云环境的信息。此外,您可以将其扩展到其他云平台和新服务。
在这篇博客(系列第一篇)中,我将介绍 Spring Cloud,并从应用程序开发者的角度展示它的用法。我们将开发一个简单的应用程序,并将其部署到 Cloud Foundry 和 Heroku。在后续博客中,我将探讨其可扩展性方面。
在云端运行应用程序的众多优势之一是各种服务的易用性。您无需管理硬件、安装、操作、备份等,只需点击按钮或执行 shell 命令即可创建和绑定服务。
应用程序如何访问这些服务?例如,如果您的应用程序绑定了一个关系型数据库,您需要基于该服务创建一个 DataSource 对象。这就是 Spring Cloud 提供帮助的地方。它消除了访问和配置服务连接器所需的所有工作,让您专注于使用这些服务。它还公开应用程序实例信息(主机地址、端口、名称等)。
Spring Cloud 通过 Cloud Connector 的概念以云无关的方式完成所有这些工作。虽然它提供了 Cloud Foundry 和 Heroku 的实现,但您(或云提供商)可以通过实现接口并利用库的其余部分将其扩展到其他云。然后,只需将包含扩展的库添加到应用程序的 classpath 中即可;无需 fork 并构建 Spring Cloud。
Spring Cloud 也认识到它不可能支持每个云上的所有服务。因此,在开箱即用地支持许多常见服务的同时,它允许您(或服务提供商)将其功能扩展到其他服务。就像为其他云进行扩展一样,您只需将包含服务扩展的 jar 添加到应用程序的 classpath 中即可。
最后,它特别支持 Spring 应用程序(在一个单独的模块中),包括 Spring Boot 应用程序,形式为 Java 和 XML 配置支持,并以易于使用的方式暴露应用程序和服务属性。这是 Spring Cloud 中唯一依赖于 Spring 的模块。其他框架提供商可以以类似方式为其框架贡献特定的支持。
让我们看看 Spring Cloud 的实际应用。
我们将从一个基于 Spring Boot 的简单应用程序(源代码)开始(传统的 Spring MVC 应用程序也可以正常工作,尽管需要更多的设置代码)。该应用程序包含一个控制器,其中注入了表示绑定服务的 bean,以及一个打印有关绑定到应用程序的服务信息的首页。
@Controller
public class HomeController {
    @Autowired(required = false) DataSource dataSource;
    @Autowired(required = false) RedisConnectionFactory redisConnectionFactory;
    @Autowired(required = false) MongoDbFactory mongoDbFactory;
    @Autowired(required = false) ConnectionFactory rabbitConnectionFactory;

    @Autowired ApplicationInstanceInfo instanceInfo;

    @RequestMapping("/")
    public String home(Model model) {
        Map<Class<?>, String> services = new LinkedHashMap<Class<?>, String>();
        services.put(dataSource.getClass(), toString(dataSource));
        services.put(mongoDbFactory.getClass(), toString(mongoDbFactory));
        services.put(redisConnectionFactory.getClass(), toString(redisConnectionFactory));
        services.put(rabbitConnectionFactory.getClass(), toString(rabbitConnectionFactory));
        model.addAttribute("services", services.entrySet());

        model.addAttribute("instanceInfo", instanceInfo);

        return "home";
    }

    // ... various toString() methods to create a string representation for each service

}
HomeController 有四个注入的依赖项,表示可以绑定到应用程序的服务,以及另一个用于 ApplicationInstanceInfo。"/” 路由将表示每个服务的字符串及其类添加到模型中,以及实例信息。关联的视图 渲染所有这些信息。
对于配置,我们添加 CloudConfig 如下
@Configuration
@ServiceScan
@Profile("cloud")
public class CloudConfig extends AbstractCloudConfig {
    @Bean
    public ApplicationInstanceInfo applicationInfo() {
        return cloud().getApplicationInstanceInfo();
    }
}
该类扩展了 AbstractCloudConfig,这是在 Spring Cloud 中使用 Java 配置方法的方式。我们设置 @Profile(“cloud”) 以确保此配置仅在云环境中加载。@ServiceScan 注解扫描所有绑定的服务,并为每个服务创建一个 bean(然后自动注入到 HomeController 中)。如果您想知道 @ComponentScan 和 @ServiceScan 之间的相似之处,您是对的。前者扫描可以实例化为 bean 的候选类,后者扫描绑定的服务。我们还创建了一个与应用程序实例信息对应的 bean。
我们包含以下 manifest.yml,它绑定了我们需要用于演示目的的所有四个服务(您需要使用 cf create-service 命令创建这些服务)
---
applications:
- name: hello-spring-cloud
  memory: 512M
  instances: 1
  host: hello-spring-cloud-${random-word}
  domain: cfapps.io
  path: target/hello-spring-cloud-0.0.1-SNAPSHOT.jar
  services:
	- postgres-service
	- amqp-service
	- mongodb-service
	- redis-service
  env:
    SPRING_PROFILES_DEFAULT: cloud
现在我们需要做的就是构建和推送
$ mvn package
$ cf push
```
Now when we visit the page, we see information about all four services:
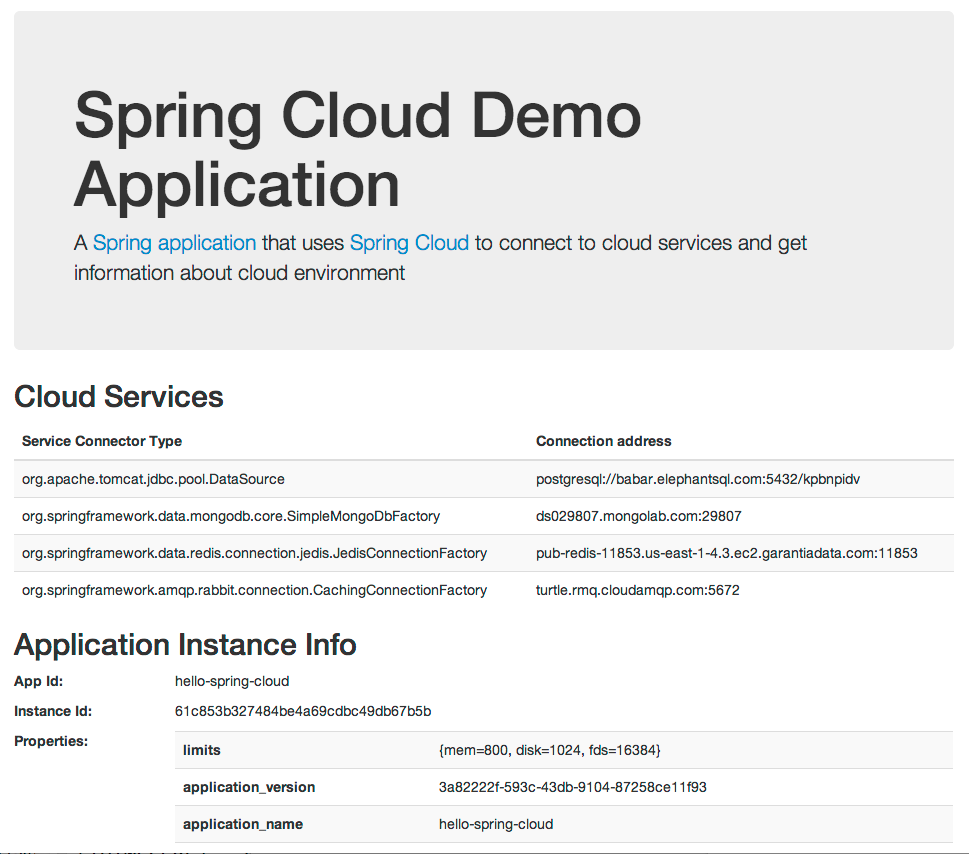
In a real app, you probably would inject these services into service beans and do something more useful that printing their connection information! Please head over to http://projects.spring.io/spring-cloud to see a list of sample apps that do more interesting things with Spring Cloud. Speaking of https://springjava.cn, it too uses Spring Cloud underneath.
# Deploying it to Heroku
We can deploy the same application to Heroku. We need to add a couple of files (neither are specific to Spring Cloud): `system.properties` to make Heroku use Java 7 and `Procfile` to make it execute the right command to start the application and enable the `cloud` profile. We push the application to Heroku as follows:
```sh
$ heroku apps:create
$ heroku addons:add mongolab
$ heroku addons:add rediscloud
$ heroku addons:add cloudamqp
$ heroku config:set SPRING_CLOUD_APP_NAME=hello-spring-cloud
$ git push heroku master
```
Here we create add-ons (similar to Cloud Foundry services) for a MongoDb, Redis, and AMQP service provider. Heroku automatically provisions a Postgres service, therefore we don’t need to explicitly add it. Heroku app’s environment, unlike Cloud Foundry, doesn’t expose the app name, so we use `heroku config:set` to explicitly set it (if not, Spring Cloud will set it to `<unknown>`). There are a few other differences in how Spring Cloud adapts to differences between these two clouds; we will cover those in a later blog.
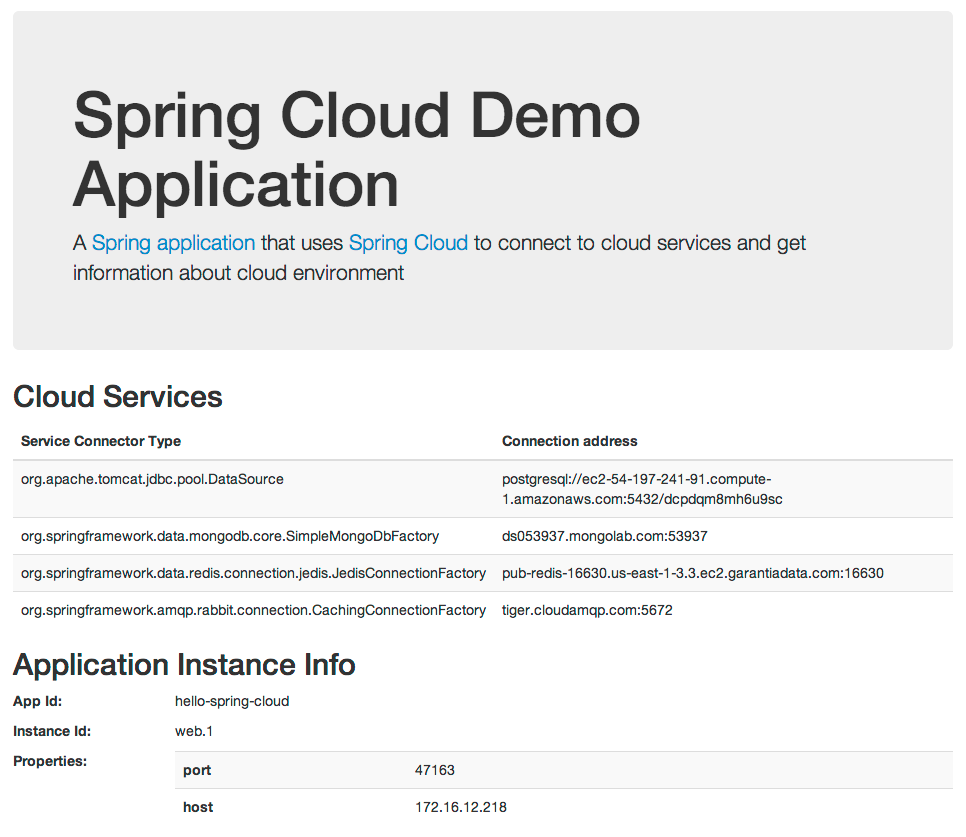
That’s all we need to do. When we visit our application, it shows all services info much the same way it did on Cloud Foundry.
# Taking some control
The use of `@ServiceScan` made it easy to grab all services and start using them. But in practice, you often need more control over creating a service connector such as setting their pooling parameters. If that is the case, you can use Spring Cloud’s Java Config or XML config support. Let’s change the `CloudConfig` class as follows:
```java
@Configuration
@Profile("cloud")
public class CloudConfig extends AbstractCloudConfig {
@Bean
public ConnectionFactory rabbitConnectionFactory() {
return connectionFactory().rabbitConnectionFactory();
}
@Bean
public DataSource dataSource() {
return connectionFactory().dataSource();
}
@Bean
public MongoDbFactory mongoDb() {
return connectionFactory().mongoDbFactory();
}
@Bean
public RedisConnectionFactory redisConnectionFactory() {
return connectionFactory().redisConnectionFactory();
}
@Bean
public ApplicationInstanceInfo applicationInfo() {
return cloud().getApplicationInstanceInfo();
}
}
```
Compared to the first version, we removed the `@ServiceScan` annotation. Instead, we use the API exposed by `AbstractCloudConfig` to create beans for each of the services. For now, the beans created this way are identical to that created by `@ServiceScan`, but we now have a possibility of configuring it further. For example, if we wanted to bind the `DataSource` bean to a specific service (presumably among many bound to the app) and initialize it with a specific pool configuration, we can make the following change:
```java
@Bean
public DataSource dataSource() {
PoolConfig poolConfig = new PoolConfig(20, 200);
ConnectionConfig connectionConfig =
new ConnectionConfig("sessionVariables=sql_mode='ANSI';characterEncoding=UTF-8");
DataSourceConfig serviceConfig =
new DataSourceConfig(poolConfig, connectionConfig);
return connectionFactory().dataSource("my-service", serviceConfig);
}
```
The `DataSource` created this way will have max pool size of 20 and max wait time of 200 milliseconds along with a specific connection property string.
# Summary
Spring Cloud abstracts connecting to cloud services and makes it possible to have the same application deployed to multiple clouds with little extra effort. In this blog we merely scratched the surface of what Spring Cloud offers. In the next blog, we will explore more about the Java and XML config as well as how you can use its core API in non-spring apps. In the blogs that follow we will dive deeper into the extensibility angle of Spring Cloud.